Are you as obsessed with these as I am? If not, you are about to be! Of course you do have to like/LOVE chocolate to really enjoy these! It is a rich, creamy, decadent beverage, that all ages enjoy. Believe me, I crank these out for my entire family, from grandparents to grandkids! So be prepared!
Fun, Festive and Delicious! After you make them, pop over to How to Enjoy your Cocoa Bomb!!
Here is the list of supplies. You might already have all or some, thought this would help so you know basically what I use.
Supplies:
- 2.5″ silicone half sphere molds
- microwave safe bowl
- silicone pastry brush
- spatula
- small skillet, or sauté pan
- chocolate melting wafers
- white chocolate melting wafers
- hot chocolate powder
- marshmallows or
- tiny marshmallows
Make the Chocolate Shells
Step 1:
To begin, melt your chocolate melting wafers. While you can use any chocolate, I like to use melting wafers since they don’t need to be tempered. Heat your melting wafers in a microwave-safe bowl for 15 seconds at a time (be sure to stir your wafers in between). I know it’s easy to skip the 15-second increments, but please don’t! You want to make sure to frequently stir your wafers to avoid burning them.
Step 2:
When completely melted, scoop 1 tablespoons of warmed chocolate into your mold. Using a silicone basting brush, evenly coat the interior of your mold with the melted chocolate. Make sure to bring your brush all the way up to the top of the mold, adding more chocolate as needed. Make sure it is completely coated, this is the first layer, the second will fill in the thin parts.
Step 3:
Place mold on a cookie sheet and set in freezer for 7 minutes. Remove, and repeat Step 2 for full and complete coverage. Then back in freezer for another 5 minutes. *Depending on the temperature in your house, you might or might not need to warm the chocolate up. If you do, only warm 10 seconds, as you dont want to burn the chocolate.
Step 4:
Once your molds are ready, remove from freezer, then carefully remove the chocolate shells. Do this by peeling the mold away from the chocolate shells.
You’ll want to go nice and slow to avoid breaking the chocolate. If your chocolate breaks along the top rim you’ll want to create a thicker shell to give the chocolate more support.
Fill and Assemble Shells:
Step 1:
Warm a skillet on the stove. Warm enough to the tough, but not too hot that it burns your finger.
Step 2:
Take one half sphere and lightly press the rim of the sphere against your warm pan for a few seconds. This ensures your shell has a smooth edge. Do this to all your half spheres.
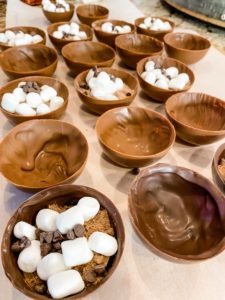
Step 3:
Now it’s time to add your filling! Using half of the spheres, fill them with hot cocoa mix, you’ll want to add 1-2 tablespoons of hot cocoa to your sphere, then fill the remainder of the sphere with marshmallows.
While I like a classic hot chocolate with marshmallows, feel free to add any fillings you wish! Like peppermint bits or caramel bits, and you can always change up you hot cocoa mix also. The possibilities are endless.
Step 4:
Now, take the half sphere that is empty and quickly melt its edges on your warmed pan. Doing this one at a time.
Line up the two half spheres and gently press them together. I find it’s easiest to do this by making sure the chocolate is at eye level so you can see if the spheres are aligned or not. Be carefully not to hold onto the chocolate for too long or it will begin to melt!
The warm chocolate acts like glue to secure the half spheres together. While the chocolate is still warm, ensure that the entire edge has been sealed together so that the hot cocoa doesn’t leak out of it. I run my finger alone the melted edge to ensure coverage.
Decorate
I warm up white chocolate the same way I did for the shells, (using much less) then transfer it to a zip lock bag. I trim a small corner of the bag, then drizzle the chocolate over the sphere. And finish with fun or seasonal sprinkles.
Troubleshooting
Streaky Chocolate – If you are using real chocolate make sure to temper your chocolate. If you are using chocolate wafer melts, make sure to allow the chocolate to harden inside of the fridge for 3-5 minutes.
Fingerprints – Wear a tight pair of rubber gloves while working to prevent any fingerprints.
Cracking – Make sure to coat the chocolate mold two times to build up a solid layer of chocolate to prevent any cracking.
Mix it up
Sea Salt & Dark Chocolate – Use a Dark chocolate wafer as your base and sprinkle coarsely ground sea salt on top of the hot cocoa bomb.
Peppermint – Chop up a candy cane and add it to the inside and outside of the hot cocoa bomb for a minty twist!
Mexican Hot Chocolate – Just a dash of cinnamon will add some kick to your hot cocoa!
Mint – Add a few Andes Mints to the inside of your hot cocoa bomb for a minty fresh taste!
ENJOY!! Please rate and comment, and don’t forget to come back soon!
~Jeanne

Ingredients
- 10 oz melting chocolate wafers, milk or dark I prefer Ghirardelli
- melting chocolate wafers, white about a big handful for the drizzle
- bag of mini marshmallows
- sprinkles of choice
Instructions
- Make the Chocolate ShellsStep 1: To begin, melt your 10 oz. of chocolate melting wafers. While you can use any chocolate, I like to use melting wafers since they don’t need to be tempered. Heat your melting wafers in a microwave-safe bowl for 15 seconds at a time (be sure to stir your wafers in between). I know it's easy to skip the 15-second increments, but please don't! You want to make sure to frequently stir your wafers to avoid burning them.Step 2: When completely melted, scoop about 1 tablespoons of warmed chocolate into your mold. Using a silicone basting brush, evenly coat the interior of your mold with the melted chocolate. Make sure to bring your brush all the way up to the top of the mold, adding more chocolate as needed. Make sure it is completely coated, this is the first layer, the second will fill in the thin parts. Step 3: Place mold on a cookie sheet and set in freezer for 5 minutes. Remove, and repeat Step 2 for full and complete coverage. Then back in freezer for another 5 minutes. *Depending on the temperature in your house, you might or might not need to warm the chocolate up. If you do, only warm 10 seconds, as you dont want to burn the chocolate.Step 4:Once your molds are ready, remove from freezer, then carefully remove the chocolate shells. Do this by peeling the mold away from the chocolate shells. You'll want to go nice and slow to avoid breaking the chocolate. If your chocolate breaks along the top rim you'll want to create a thicker shell to give the chocolate more support.Fill and Assemble Shells:Step 1:Warm a skillet on the stove. Warm enough to the tough, but not too hot that it burns your finger.Step 2:Take one half sphere and lightly press the rim of the sphere against your warm pan for a few seconds. This ensures your shell has a smooth edge. Do this to all your half spheres.Step 3:Now it's time to add your filling! Using half of the spheres, fill them with hot cocoa mix, you'll want to add 1-2 tablespoons of hot cocoa to your sphere, then fill the remainder of the sphere with marshmallows. While I like a classic hot chocolate with marshmallows, feel free to add any fillings you wish! Like peppermint bits or caramel bits, and you can always change up you hot cocoa mix also. The possibilities are endless. Step 4:Now, take the half sphere that is empty and quickly melt its edges on your warmed pan. Doing this one at a time. Line up the two half spheres and gently press them together. I find it's easiest to do this by making sure the chocolate is at eye level so you can see if the spheres are aligned or not. Be carefully not to hold onto the chocolate for too long or it will begin to melt!The warm chocolate acts like glue to secure the half spheres together. While the chocolate is still warm, ensure that the entire edge has been sealed together so that the hot cocoa doesn't leak out of it. I run my finger alone the melted edge to ensure coverage.DecorateI lay down some parchment paper, and place the cocoa bombs on top for easier clean-upI warm up a big handful of white chocolate, the same way I did for the shells, then transfer it to a zip lock bag. I trim a small corner of the bag, then drizzle the chocolate over the sphere. And finish with fun or seasonal sprinkles. TroubleshootingStreaky Chocolate – If you are using real chocolate make sure to temper your chocolate. If you are using chocolate wafer melts, make sure to allow the chocolate to harden inside of the fridge for 3-5 minutes.Fingerprints – Wear a tight pair of rubber gloves while working to prevent any fingerprints.Cracking – Make sure to coat the chocolate mold two times to build up a solid layer of chocolate to prevent any cracking.Mix it upSea Salt & Dark Chocolate – Use a Dark chocolate wafer as your base and sprinkle coarsely ground sea salt on top of the hot cocoa bomb.Peppermint – Chop up a candy cane and add it to the inside and outside of the hot cocoa bomb for a minty twist!Mexican Hot Chocolate – Just a dash of cinnamon will add some kick to your hot cocoa!Mint – Add a few Andes Mints to the inside of your hot cocoa bomb for a minty fresh taste!
Leave a Reply